All Categories
Featured
Table of Contents
- – Rv Roof Repair Near Me Pomona, CA
- – OCRV Center
- – Rv Trailer Rubber Roof Repair Pomona, CA
- – Rubber Roofing For Rv Pomona, CA
- – Rv Roof Maintenance Pomona, CA
- – Rv Trailer Roof Repair Pomona, CA
- – Rubber Roof Installation Pomona, CA
- – Rubber Roofing For Campers Pomona, CA
- – Rv Rubber Roof Maintenance Pomona, CA
- – Rubber Roof For Rv Pomona, CA
- – Rv Roof Leak Repair Pomona, CA
- – Rv Rubber Roof Replacement Cost Pomona, CA
- – Rv Roof Leak Repair Pomona, CA
- – Repair Rv Roof Pomona, CA
- – OCRV Center
Rv Roof Repair Near Me Pomona, CA
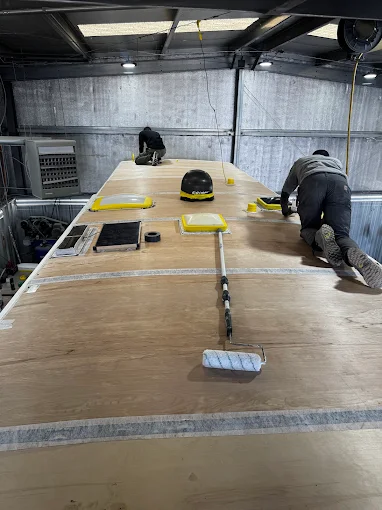
Clean it dry and then permit the surface area to completely dry in the sun prior to applying the tape per the guidelines. When you use the tape, be certain to push each item down totally, removing any kind of air bubbles and requiring the tape down completely to the surface in any type of low places.
The lifespan of recreational vehicle roofings differs commonly depending upon quality, material, and the degree of maintenance they have gotten. Ten to twenty years is a sensible quote for the entire life expectancy of a roof. If you assume you may require a new roof covering, I recommend getting it inspected and priced by an expert before attempting to attend to massive leaks by yourself.
Rv Trailer Rubber Roof Repair Pomona, CA
And afterwards all of your time, initiative, and prices can be thrown away if it's time for a brand-new roofing system. Roof covering leakages are just one of the fantastic usual denominators of recreational vehicle life. Every RV, from the snazziest class A to the most penny-wise and utilitarian traveling trailer, will certainly leak at some time.
In that situation, you may desire to have a look at these related guides: Our responses to regularly asked questions concerning fixing motor home roofing system leaks: Do not put things off. Leaks just become worse and much more pricey to deal with over time. It's difficult to say, as various makes and designs exist. Someplace in between 10 and twenty years is a great hunch.
are thought about by several to be the best product for many applications. There are comparable products available. It relies on the sealant you make use of. Most items are designed to treat the fastest around "area temperature level," which is usually around 60 or 70 degrees. Check the guidelines on the sealant of your option to verify.
Rubber Roofing For Rv Pomona, CA
I have actually utilized Flex Seal items for fast, short-lived fixings to our RV's wall surfaces, and they functioned well. It depends on your plan terms and what created the roof leak.
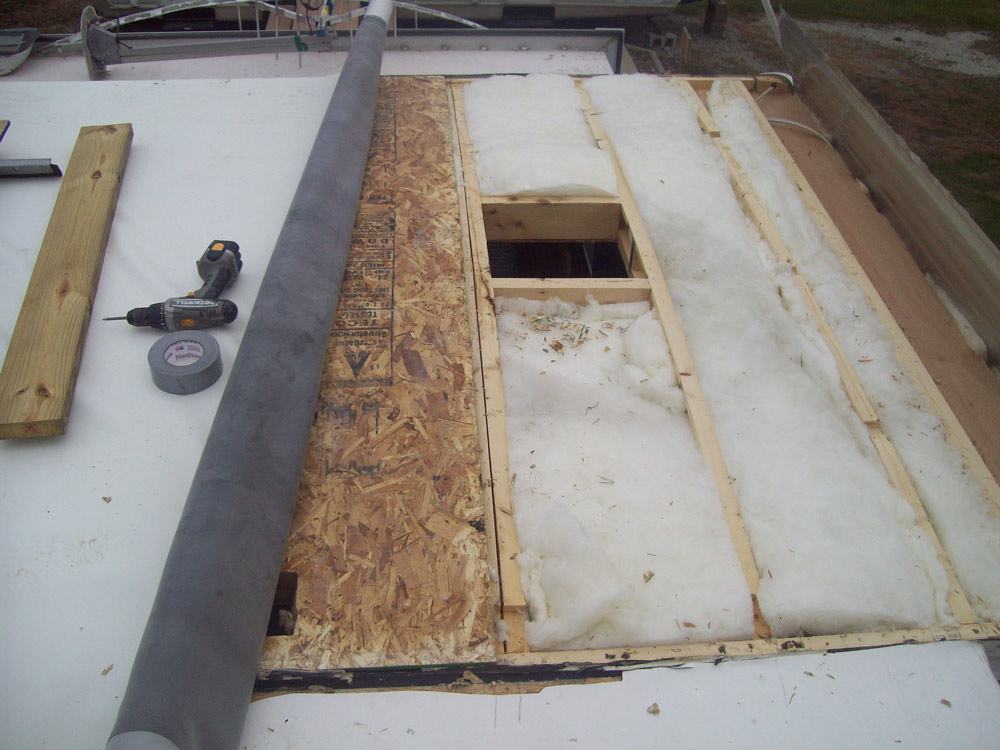
Below are some photos of a project I did to fix roof rot on my fifth wheel camper. I selected to use this technique since I could do it myself with my own sources and skills. Otherwise, a whole lot of equipment, consisting of the ladder and roofing system shelf, the endcap and the filon outer wall would certainly have needed to be torn apart.
In fact, I like it in this manner given that I know just how the fix was done. And also, I would certainly have had to get it out, probably costing me thousands of bucks. I utilized items from The Rot Doctor. I have no association with the business. They were very useful in discussing my options and in describing the techniques to utilized their products.
I utilized a box knife to cut the rubber roof in the corner. It most likely leaked from the time the unit was new, as the roofing system was very soft in this edge, and we have actually been in drought conditions for 2 years.
Rv Roof Maintenance Pomona, CA
Folding back the rubber disclosed the rotten location. Right here I have actually currently cleaned out what soft rotted timber I could with my bare hands. Next I cut a diagonal with a keyhole attended cleanse up the side where it was feathered from rot. 3 - Rubber Roof Installation Pomona. I reduced a piece of plywood like a puzzle to match the shape of the hole I made in the roofing.
Here's the sprayer I used to apply the CPES * from The Rot Doctor. With its 18 steel "wand" I could penetrate right into the 2 space between the roofing system and the ceiling.
6. Below's the finished roof covering secured up with Eternabond tape. I ran a strip of Eternabond right throughout the camper where the roof fulfills the endcap. Any kind of concerns of a leak right here are a distant memory. 7. I additionally had rot in the wall surface straight listed below the area on the roof.
Here I have actually removed the wall surface product and damp insulation to reveal the location influenced. 8. I thoroughly dried out the location for numerous days utilizing the exhaust side of a small hoover, placing the hose pipe between the internal and external wall surfaces. When it was completely dry I covered every little thing with CPES *, utilizing the bug sprayer to pass through into otherwise inaccessible areas.
Rv Trailer Roof Repair Pomona, CA
Keep in mind the leading 3-4 of the stud was completely decomposed away. I spread out Fill-It Epoxy Filler * throughout the location. The things goes on like a thick and sticky gel, then dries to an extremely hard product that bonds to the CPES * I had sprayed onto the wood.
Here's the completed product. Really feel cost-free to call us if you require assistance with which items to make use of.
In this overview, we'll explore the prices, advantages, and options for securing and repairing your recreational vehicle roofing, assisting you make the best choice for your car. While some signs that your motor home roofing is damaged or leaky are noticeable, such as water streaming in throughout a rainstorm, various other indications of damages may not be as readily evident.
Rubber Roof Installation Pomona, CA
If the architectural honesty is still sound, sealing and reinforcing it with Fluid Rubber items might be the smarter, a lot more affordable service. As soon as you recognize your motor home's roofing type, you must think about the expense of changing it. The expense will certainly vary depending upon the dimension of the motor home, the kind of roof, and the materials made use of.
Along with the price of the products, must likewise be taken into consideration. If you pick to hire a for the job, then you can expect to pay anywhere from for labor, depending upon the size of the RV, the kind of roofing and the intricacy of the task. If you pick to do the work yourself, you can expect to pay just for the materials and the investment of your do it yourself sweat equity.
Rubber Roofing For Campers Pomona, CA
Don't wait up until your roof leaks obtain worse. Seal, shield, and extend the life of your recreational vehicle roofing system today with Liquid Rubber RV Roof Finishingthe trusted, affordable remedy that recreational vehicle proprietors like. The price of sealing your motor home roof on your own mostly depends on the high quality of the sealer you select.
One application covers up to a 30' RV. Provided its easy application and comprehensive coverage, the labor costs stay marginal, making it an eye-catching alternative for those looking to conserve on upkeep prices.
The price of a full Motor home roofing substitute ranges from $2,500 to $10,000. A gallon of Liquid Rubber Motor Home Roofing Coating is, and a full set is.
Sealer supplies affordable roof security, setting you back regarding per tube for area repairs. Complete roofing elimination and substitute. $2,500 - $10,000+ (materials and labor). Proactive actions aim to postpone or eliminate the need for complete substitute considerably. As this comparison shows, proactive maintenance of your motor home roof is considerably more cost-efficient than dealing with the aftermath of damage.
Rv Rubber Roof Maintenance Pomona, CA
There are a number of different sorts of RV roofing system replacement. One of the most common kind is a rubber roofing. Rubber High Lightweight Inexpensive Low No Metal Extremely High Lightweight Expensive Low Yes Fiberglass High Heavy Moderate Reduced Yes Acrylic Moderate Very Light Economical Reduced No Each roofing type has advantages and downsides, so the very best selection depends upon your certain demands.
When you utilize Fluid Rubber Sealer items, follow the application guidelines carefully. The guidelines will certainly indicate for how long the item takes to cure so you can set up the application around your neighborhood weather patterns. Fluid Rubber motor home Roofing system Finishing attracts attention for its very easy application procedure. Its fluid kind makes certain full coverage of the entire roofing.
There are several factors to regularly recoat your recreational vehicle roof, sealing it against water damages, sun, wind, and damage. Like any automobile, recreational vehicle roofs are built to endure difficult weather, from snow to hail to a deluge. Nonetheless, the roofing material can still wear out in time - Rubber Roof Installation Pomona.
Rubber Roof For Rv Pomona, CA
Making Use Of Fluid Rubber RV roof products offers you confidence that you use the ideal remedies with the strongest reputation. Resealing your motor home roof is a workable do it yourself task if you take it step-by-step. Below's a streamlined review:: Inspect your roof covering for cracks, old sealer, and damage. Clean the entire roofing surface using a recreational vehicle roofing cleaner and a scrub brush.
: Thoroughly remove any type of falling short or split sealant around vents, skylights, and seams making use of a plastic scrape or specialized sealer elimination device. Be cautious not to damage the roofing material.: Utilizing a self-leveling sealer (particularly designed for motor home roofing systems), apply a generous bead along all joints, around vents, skylights, and any various other roofing system infiltrations.
: If you have splits or damages, consider making use of motor home roof repair service tape or a liquid rubber finishing, following the item instructions carefully.: Once the sealer has treated (check product instructions for treating time), examine the entire roofing system to make certain all locations are correctly sealed.: Always seek advice from the specific instructions for your sealer and fixing products.
Even small leakages can create:: Decaying wood, weakening of the roof covering framework, and damages to wall surfaces and ceilings.: This produces undesirable living problems and damages the motor home's interior.: Reducing the effectiveness of your recreational vehicle's insulation.: Resolving water damages is significantly extra expensive than preventative upkeep like normal evaluations and resealing.
Rv Roof Leak Repair Pomona, CA
To identify whether your RV roofing is made of EPDM or TPO, follow these steps:: Locate a roof vent on your RV.: Unscrew and remove the trim ring to expose an area of the roofing system material.: Preferably, remove a staple from the roofing product and analyze both sides: If one side is white or dove grey with a black backing, it is most likely EPDM.
The primary difference between RV roof sealer and finish is their objective and application.: This is generally used to load spaces, seams, and fractures in the roof covering material. It offers a water resistant obstacle to avoid leaks and is typically used in particular areas, such as around vents, seams, and other penetrations.
: This is a safety layer that covers the whole roof covering surface area. Coatings are normally used to boost UV resistance, reflectivity, and general roofing durability.
Rv Rubber Roof Replacement Cost Pomona, CA
CLEAN, CLEAN CLEAN the roofing system before applying the finishing. Did I mention Cleansing the roof? Best of luck.
CLEAN, CLEAN CLEAN the roofing system before applying the finish. Did I state Cleaning the roofing? Good Luck.
In this blog post, we desire to share with you just how to Do it yourself Recreational vehicle roof repair. Recognizing just how to DIY a great deal of the things that can break or mess up will conserve you not just a great deal of cash on Motor home fixings but could also conserve you a lot of prospective time in the store!
I might obtain a small payment when you make a purchase using my web link. We try to plan our paths meticulously to stay clear of low-hanging objects over the roadway. This is how we finished up with a couple of small splits on the roof covering of our Motor home.
Rv Roof Leak Repair Pomona, CA
We believed we were free from the branches, yet we wound up capturing a few of them on the far left side of the roof. There were a total amount of 4-5 small holes in the side of the roofing system. We didn't examine the roof since we didn't assume we strike anything.
One of the splits in our recreational vehicle roofing system A few weeks later, we withstood an extreme thunderstorm and a LOT of rainfall. During the storm, we located that we had a percentage of water dripping via among the lighting fixtures in the washroom. Thankfully, we did not wind up with any kind of permanent water damages.
He patched it as finest he can with sturdy gorilla tape and afterwards got the materials required to do a motor home roof covering repair. The EPDM rubber roofing product that many Motor homes feature is usually rather tough regarding roof covering materials go (Rubber Roof Installation Pomona). Rubber roofing systems last for years, yet they do tear if caught hard enough
In our situation, this implied eliminating the gorilla tape that we had made use of as a short-term solution while we waited on the materials we purchased to get here. You'll desire to clean the location around the tear that you will certainly be covering well. This allows the spot to properly adhere and will protect against future leakages.
Repair Rv Roof Pomona, CA
OCRV Center
Address: 23281 La Palma Ave Yorba Linda, CA 92887Phone: (714) 909-1444
Email: [email protected]
OCRV Center
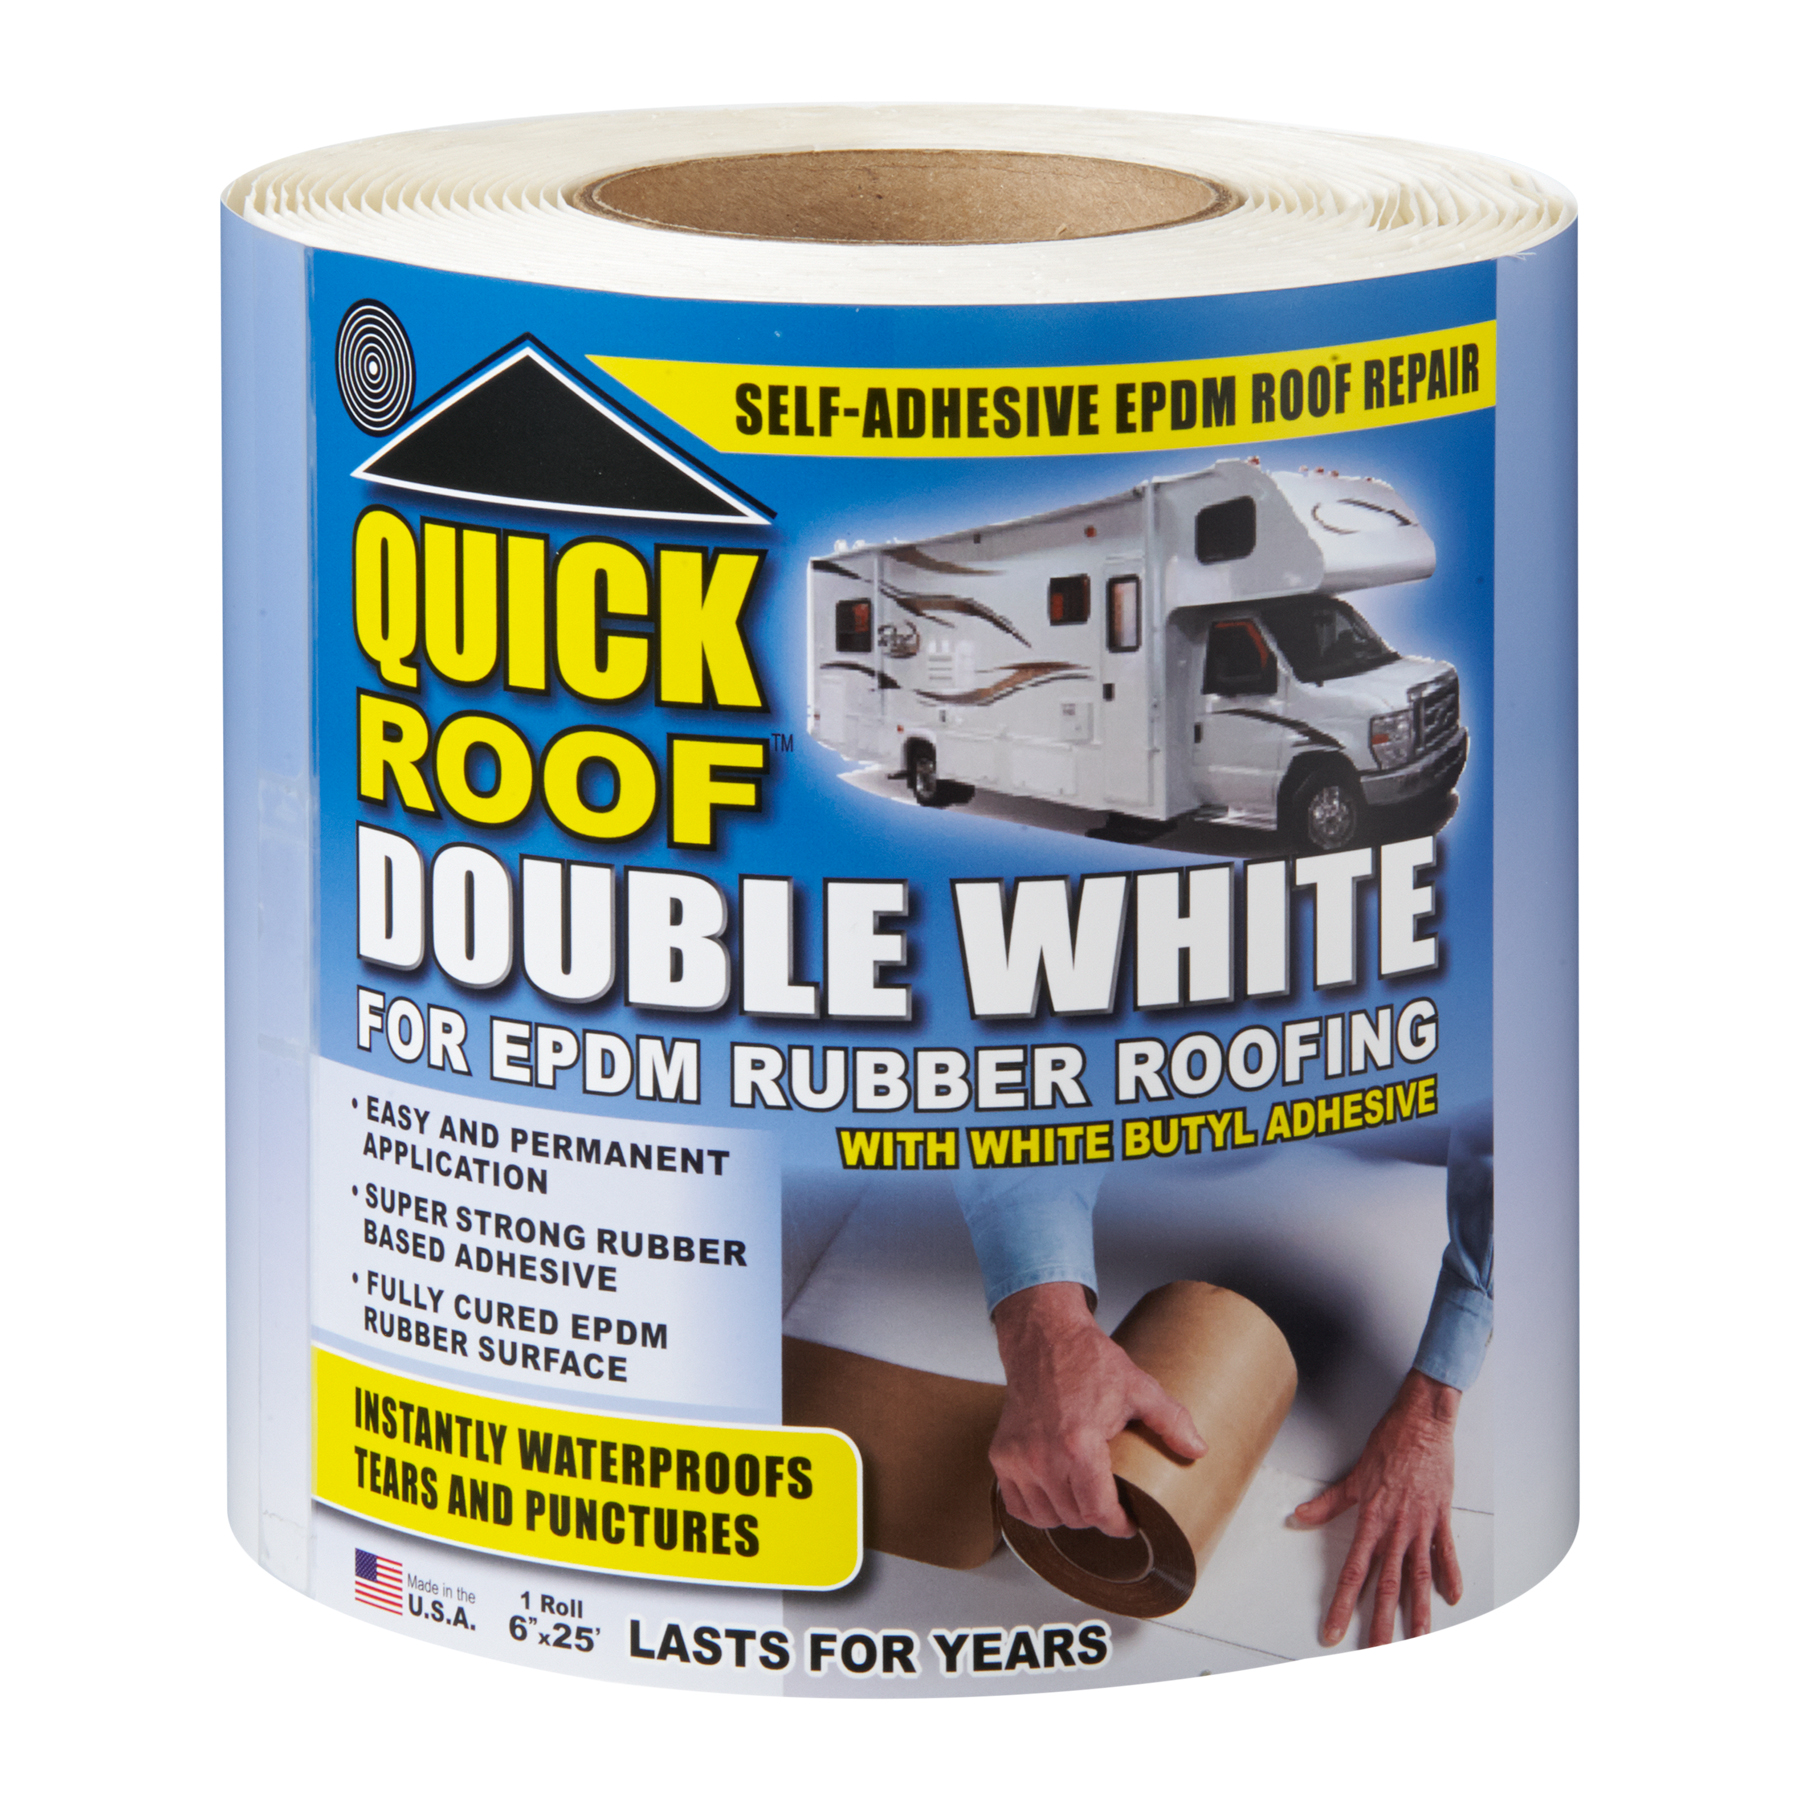
To clean the roof covering, utilize scrubing alcohol and either a rag or paper towels., which is a RV roof repair tape.
Best Rv Roof Repair Pomona, CARv Roof Maintenance Pomona, CA
Epdm Rv Roof Repair Pomona, CA
Rv Roof Leak Repair Pomona, CA
Repair Rv Roof Leak Pomona, CA
Rv Rubber Roof Replacement Cost Pomona, CA
Motorhome Roof Replacement Pomona, CA
Replace Rv Roof Pomona, CA
Rv Roof Repair Pomona, CA
Class C Rv Roof Repair Pomona, CA
Roof Repair For Rv Pomona, CA
Best Rv Roof Repair Pomona, CA
Rubber Roof Installation Pomona, CA
Rv Rubber Roof Replacement Pomona, CA
Rv Rubber Roof Maintenance Pomona, CA
Rv Rubber Roof Replacement Pomona, CA
Rv Slide Out Roof Repair Pomona, CA
Repair Rv Roof Leak Pomona, CA
Resealing Rv Roof Pomona, CA
Rv Roof Leak Repair Near Me Pomona, CA
Rv Rubber Roof Repair Pomona, CA
Rv Roof Leak Repair Pomona, CA
Rv Roof Repair Pomona, CA
Rv Fiberglass Roof Repair Pomona, CA
Rubber Roof For Rv Pomona, CA
Rv Roof Repair Fiberglass Pomona, CA
Rv Roof Repair Service Near Me Pomona, CA
Rubber Roofing For Rv Pomona, CA
Rv Roof Repair Near Me Pomona, CA
Rubber Roof Installation Pomona, CA
Rv Rubber Roof Repair Pomona, CA
Rv Trailer Roof Repair Pomona, CA
Rv Fiberglass Roof Repair Pomona, CA
Motorhome Roof Replacement Pomona, CA
Repair Rv Roof Pomona, CA
Rv Rubber Roof Replacement Cost Pomona, CA
Replace Rv Roof Pomona, CA
Rubber Roof For Rv Pomona, CA
Rv Trailer Roof Repair Pomona, CA
Rv Rubber Roof Replacement Cost Pomona, CA
Rv Trailer Rubber Roof Repair Pomona, CA
Rubber Roof For Camper Pomona, CA
Best Rv Roof Repair Pomona, CA
Repair Rv Roof Pomona, CA
Rubber Roof Installation Pomona, CA
Rv Rubber Roof Repair Pomona, CA
Rv Trailer Rubber Roof Repair Pomona, CA
Repair Rv Roof Leak Pomona, CA
Rubber Roof For Camper Pomona, CA
Class C Rv Roof Repair Pomona, CA
Rv Roof Maintenance Pomona, CA
Rv Trailer Roof Repair Pomona, CA
Repair Rv Roof Pomona, CA
Epdm Rv Roof Repair Pomona, CA
Rv Roof Repair Fiberglass Pomona, CA
Replace Rv Roof Pomona, CA
Repair Rv Roof Leak Pomona, CA
Rv Rubber Roof Replacement Cost Pomona, CA
Resealing Rv Roof Pomona, CA
Rv Trailer Rubber Roof Repair Pomona, CA
Rv Rubber Roof Maintenance Pomona, CA
Rv Trailer Rubber Roof Repair Pomona, CA
Rubber Roof For Rv Pomona, CA
Repair Rv Roof Leak Pomona, CA
Rubber Roofing For Campers Pomona, CA
Rv Rubber Roof Maintenance Pomona, CA
Rubber Roof For Rv Pomona, CA
Rv Roof Repair Pomona, CA
Rv Roof Leak Repair Near Me Pomona, CA
Rv Fiberglass Roof Repair Pomona, CA
Rubber Roofing For Campers Pomona, CA
Rubber Roofing For Rv Pomona, CA
Rv Slide Out Roof Repair Pomona, CA
Rv Rubber Roof Replacement Cost Pomona, CA
Rv Fiberglass Roof Repair Pomona, CA
Resealing Rv Roof Pomona, CA
Rv Slide Out Roof Repair Pomona, CA
Rv Trailer Rubber Roof Repair Pomona, CA
Around Here Top Seo Company Pomona, CA
Around Me Seo Management Pomona, CA
OCRV Center
Table of Contents
- – Rv Roof Repair Near Me Pomona, CA
- – OCRV Center
- – Rv Trailer Rubber Roof Repair Pomona, CA
- – Rubber Roofing For Rv Pomona, CA
- – Rv Roof Maintenance Pomona, CA
- – Rv Trailer Roof Repair Pomona, CA
- – Rubber Roof Installation Pomona, CA
- – Rubber Roofing For Campers Pomona, CA
- – Rv Rubber Roof Maintenance Pomona, CA
- – Rubber Roof For Rv Pomona, CA
- – Rv Roof Leak Repair Pomona, CA
- – Rv Rubber Roof Replacement Cost Pomona, CA
- – Rv Roof Leak Repair Pomona, CA
- – Repair Rv Roof Pomona, CA
- – OCRV Center
Latest Posts
Health Insurance Seniors Tustin
Huntington Beach Health Insurance For Seniors
Best Private Health Insurance Plans Villa Park
More
Latest Posts
Health Insurance Seniors Tustin
Huntington Beach Health Insurance For Seniors
Best Private Health Insurance Plans Villa Park