All Categories
Featured
Table of Contents
- – Rubber Roof For Camper Pomona, CA
- – OCRV Center
- – Rv Trailer Rubber Roof Repair Pomona, CA
- – Rubber Roofing For Rv Pomona, CA
- – Rv Roof Repair Near Me Pomona, CA
- – Rubber Roof Installation Pomona, CA
- – Best Rv Roof Repair Pomona, CA
- – Rv Roof Repair Fiberglass Pomona, CA
- – Rv Roof Repair Pomona, CA
- – Repair Rv Roof Pomona, CA
- – Rv Roof Repair Service Near Me Pomona, CA
- – Epdm Rv Roof Repair Pomona, CA
- – Rv Rubber Roof Replacement Cost Pomona, CA
- – Rubber Roof Installation Pomona, CA
- – OCRV Center
Rubber Roof For Camper Pomona, CA
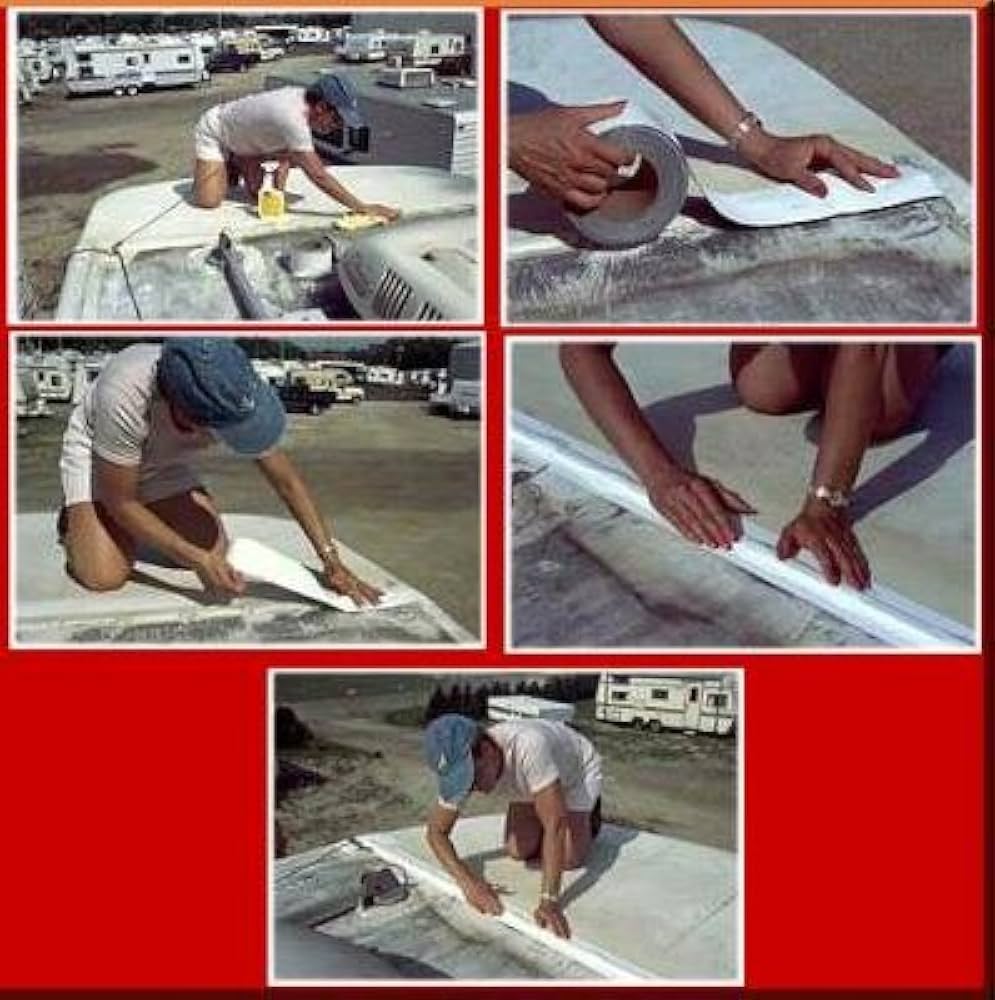
Clean it completely dry and afterwards permit the surface to dry in the sunlight prior to applying the tape per the directions. When you use the tape, make certain to press each piece down completely, getting rid of any air bubbles and requiring the tape down all the means to the surface area in any reduced spots.
The life expectancy of motor home roofings differs extensively relying on high quality, material, and the level of upkeep they have actually gotten. Ten to twenty years is a sensible quote for the entire life expectancy of a roofing. If you think you may need a new roof, I suggest obtaining it examined and valued by a professional prior to attempting to deal with large-scale leaks on your own.
Rv Trailer Rubber Roof Repair Pomona, CA
And after that every one of your time, initiative, and prices could be lost if it's time for a new roof covering. Roofing system leakages are just one of the fantastic usual denominators of recreational vehicle life. Every RV, from the snazziest class A to the most penny-wise and utilitarian travel trailer, will certainly leak at some factor.
In that case, you might desire to take a look at these associated guides: Our answers to often asked inquiries about fixing RV roofing leakages: Do not put things off. Leaks only worsen and more pricey to deal with in time. It's hard to state, as various makes and designs exist. Someplace between 10 and 20 years is a great hunch.
It depends on the sealer you use. Inspect the guidelines on the sealer of your option to verify.
Rubber Roofing For Rv Pomona, CA
I've made use of Flex Seal products for fast, short-term repair services to our Recreational vehicle's wall surfaces, and they functioned well. It depends on your policy terms and what caused the roofing leak.
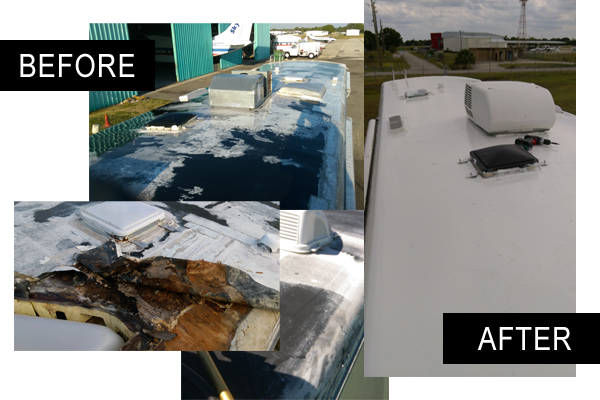
Below are some photos of a project I did to repair roofing system rot on my fifth wheel camper. I selected to utilize this approach because I might do it myself with my own sources and abilities. Or else, a great deal of equipment, including the ladder and roof covering rack, the endcap and the filon outer wall would have had to be torn apart.
As a matter of fact, I prefer it this method considering that I recognize how the fix was done. And also, I would have had to contract it out, possibly costing me countless dollars. I made use of products from The Rot Medical professional. I have no affiliation with the business. They were really practical in discussing my choices and in explaining the strategies to used their products.
I utilized a box knife to cut the rubber roof covering in the edge. It most likely dripped from the time the device was brand-new, as the roofing was extremely soft in this corner, and we've been in dry spell conditions for 2 years.
Rv Roof Repair Near Me Pomona, CA
Folding back the rubber revealed the rotten area. Right here I have actually already gotten rid of out what soft decayed wood I could with my bare hands. Following I cut a diagonal with a keyhole saw to tidy up the side where it was feathered from rot. 3 - Pomona Best Rv Roof Repair. I cut a piece of plywood like a puzzle to match the form of the hole I made in the roofing.
Below's the sprayer I utilized to use the CPES * from The Rot Medical professional. With its 18 steel "stick" I might penetrate right into the 2 area in between the roofing system and the ceiling.
6. Right here's the completed roof covering sealed up with Eternabond tape. I ran a strip of Eternabond right across the camper where the roofing satisfies the endcap. Any kind of fears of a leakage right here are a distant memory. 7. I likewise had rot in the wall directly below the area on the roof.
Right here I've removed the wall surface product and damp insulation to expose the location impacted. 8. I thoroughly dried out the location for a number of days utilizing the exhaust side of a little vacuum cleaner, placing the pipe in between the inner and external wall surfaces. When it was extensively dry I covered everything with CPES *, making use of the bug sprayer to pass through right into or else unattainable areas.
Rubber Roof Installation Pomona, CA
Keep in mind the leading 3-4 of the stud was entirely decayed away. I think at this moment the framework is as strong as the original manufacture. 9. I spread Fill-It Epoxy Filler * throughout the area. Not rather, yet then it will be hidden later on. Right stuff goes on like a thick and sticky gel, after that dries to an extremely difficult material that bonds to the CPES * I had sprayed onto the timber.
Right here's the completed product. Complete expense was concerning $200.00 plus several hours of my time. * These items are unavailable, we are offering similar items that will carry out these very same tasks. Do not hesitate to contact us if you need assistance with which products to use.
In this guide, we'll check out the prices, benefits, and choices for sealing and fixing your motor home roofing, helping you make the very best choice for your automobile. While some signs that your RV roofing is harmed or leaky are apparent, such as water streaming in throughout a rainstorm, other indicators of damage might not be as readily apparent.
Best Rv Roof Repair Pomona, CA
If the structural integrity is still sound, securing and enhancing it with Liquid Rubber products might be the smarter, much more economical service. As soon as you understand your RV's roofing kind, you must think about the price of replacing it. The cost will differ relying on the size of the recreational vehicle, the sort of roofing, and the materials utilized.
Along with the cost of the products, need to also be thought about. If you select to work with a for the task, then you can anticipate to pay anywhere from for labor, depending upon the dimension of the motor home, the kind of roof covering and the complexity of the work. If you pick to do the work on your own, you can expect to pay only for the materials and the financial investment of your do it yourself sweat equity.
Rv Roof Repair Fiberglass Pomona, CA
Do not wait until your roofing leaks get even worse. Seal, safeguard, and expand the life of your recreational vehicle roofing today with Liquid Rubber Recreational Vehicle Roof Coveringthe relied on, cost-effective remedy that recreational vehicle proprietors like. The cost of securing your RV roof covering yourself greatly depends upon the top quality of the sealant you choose.
One application hides to a 30' RECREATIONAL VEHICLE. Offered its very easy application and extensive protection, the labor prices remain marginal, making it an appealing option for those aiming to save money on maintenance expenses. Got Questions? Download our Application Guide Right Here Recreational vehicle roofing sealer is a cost-effective, all-inclusive remedy for roofing system protection.
The price of a full recreational vehicle roof replacement ranges from $2,500 to $10,000. Fixing areas can cost $300 to $2,000+, depending upon the degree of the damages. A gallon of Fluid Rubber RV Roof Covering Layer is, and a full set is. Regular upkeep can extend your roof covering's life-span and conserve significant expenses, protecting against water breach.
Sealant provides low-cost roofing defense, costing regarding per tube for spot fixings. Total roof elimination and substitute. $2,500 - $10,000+ (materials and labor). Aggressive procedures intend to postpone or eliminate the requirement for full substitute substantially. As this contrast shows, positive upkeep of your motor home roofing system is substantially extra affordable than managing the results of damages.
Rv Roof Repair Pomona, CA
There are several different sorts of RV roof replacement. One of the most common type is a rubber roof. Rubber High Lightweight Inexpensive Low No Steel Extremely High Lightweight Expensive Low Yes Fiberglass High Heavy Moderate Reduced Yes Acrylic Moderate Extremely Light Affordable Reduced No Each roofing kind has advantages and downsides, so the very best choice depends on your details needs.
When you utilize Fluid Rubber Sealer items, adhere to the application guidelines thoroughly. Its liquid kind makes certain total coverage of the entire roofing.
There are many reasons to routinely recoat your recreational vehicle roofing, securing it versus water damages, sun, wind, and damage. Like any kind of electric motor vehicle, motor home roofings are constructed to endure difficult weather condition, from snow to hail to a deluge. The roof product can still wear out over time.
Repair Rv Roof Pomona, CA
Utilizing Liquid Rubber RV roofing system items offers you self-confidence that you use the most effective services with the toughest credibility. Resealing your motor home roof is a workable DIY job if you take it step-by-step. Below's a streamlined overview:: Inspect your roof covering for fractures, old sealant, and damages. Clean the entire roof covering surface area making use of a RV roofing cleaner and a scrub brush.
: Carefully get rid of any kind of falling short or cracked sealer around vents, skylights, and seams utilizing a plastic scrape or specialized sealer elimination tool. Beware not to harm the roofing material.: Utilizing a self-leveling sealant (particularly developed for RV roofing systems), use a charitable grain along all seams, around vents, skylights, and any other roofing system penetrations.
: If you have cracks or damages, consider using RV roofing system repair service tape or a liquid rubber coating, complying with the item guidelines carefully.: Once the sealant has actually healed (check product instructions for healing time), examine the entire roof to guarantee all areas are properly sealed.: Constantly speak with the certain guidelines for your sealant and fixing items.
Even tiny leaks can cause:: Decaying wood, weakening of the roof covering framework, and damage to wall surfaces and ceilings.: This creates undesirable living problems and harms the RV's interior.: Lowering the performance of your motor home's insulation.: Dealing with water damage is considerably more costly than preventative upkeep like regular evaluations and resealing.
Rv Roof Repair Service Near Me Pomona, CA
To determine whether your motor home roofing is constructed from EPDM or TPO, comply with these steps:: Find a roof covering vent on your RV.: Unscrew and take off the trim ring to expose a section of the roofing system material.: When possible, remove a staple from the roofing product and check out both sides: If one side is white or dove grey with a black support, it is likely EPDM.
The main distinction in between RV roof covering sealer and finish is their purpose and application.: This is typically made use of to load voids, seams, and cracks in the roof covering material. It offers a water resistant obstacle to stop leaks and is often applied in specific areas, such as around vents, joints, and various other penetrations.
: This is a protective layer that covers the entire roof surface area. Coatings are typically put on enhance UV resistance, reflectivity, and overall roofing durability. They can assist extend the life of the roofing product by supplying an extra barrier against weather condition aspects. Both products are essential for keeping a RV roof covering but offer distinct functions, ensuring its longevity and performance.
Epdm Rv Roof Repair Pomona, CA
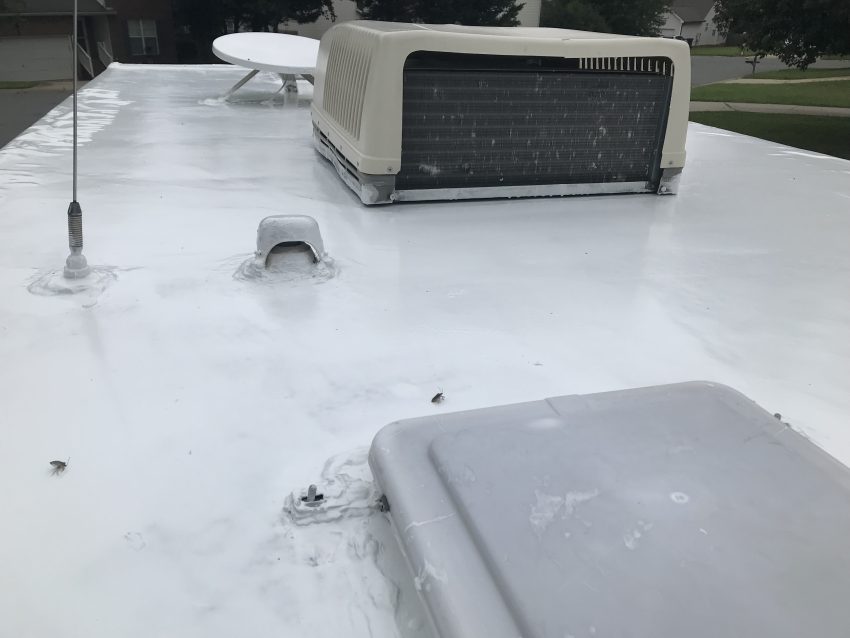
CLEAN, CLEAN CLEAN the roofing system before using the finish. Did I state Cleansing the roof? All the best.
CLEAN, CLEAN CLEAN the roof before applying the finish. Did I point out Cleansing the roofing system? All the best.
In this blog post, we intend to show to you just how to do it yourself RV roofing system repair. Residing in a recreational vehicle has outstanding moments, however points additionally fail. Knowing how to DIY a great deal of things that can break or screw up will certainly save you not only a great deal of money on RV repair services however can additionally conserve you a great deal of possible time in the shop! This message may consist of affiliate links.
I might obtain a little payment when you purchase using my web link. Review our Disclaimer Policy for even more information. We try to prepare our courses thoroughly to prevent low-hanging items over the road. In some cases, however, we locate ourselves in unplanned situations. This is exactly how we ended up with a few small splits on the roof covering of our RV.
Rv Rubber Roof Replacement Cost Pomona, CA
We believed we were free from the branches, yet we finished up catching a few of them on the far left side of the roofing system. There were an overall of 4-5 tiny openings in the side of the roof. Initially, we really did not examine the roofing since we really did not think we strike anything.
One of the tears in our motor home roof A few weeks later, we sustained an extreme thunderstorm and a great deal of rainfall. During the storm, we located that we had a percentage of water dripping through among the light fixtures in the shower room. Luckily, we did not wind up with any kind of permanent water damage.
He covered it as finest he could with durable gorilla tape and after that ordered the materials needed to do a recreational vehicle roofing repair. The EPDM rubber roof material that the majority of Motor homes come with is normally quite difficult as much as roof covering materials go (Pomona Best Rv Roof Repair). Rubber roof coverings last for many years, yet they do tear if captured hard enough
In our case, this implied getting rid of the gorilla tape that we had actually utilized as a short-term repair while we waited on the products we bought to show up. You'll desire to clean the location around the tear that you will be patching well. This permits the patch to appropriately adhere and will certainly protect against future leaks.
Rubber Roof Installation Pomona, CA
OCRV Center
Address: 23281 La Palma Ave Yorba Linda, CA 92887Phone: (714) 909-1444
Email: [email protected]
OCRV Center
To clean the roof covering, use massaging alcohol and either a cloth or paper towels., which is a Motor home roofing system fixing tape.
Roof Repair For Rv Pomona, CARv Roof Replacement Pomona, CA
Roof Repair For Rv Pomona, CA
Rv Roof Repair Service Near Me Pomona, CA
Rv Roof Repair Service Near Me Pomona, CA
Motorhome Roof Replacement Pomona, CA
Rv Roof Leak Repair Pomona, CA
Rubber Roofing For Campers Pomona, CA
Class C Rv Roof Repair Pomona, CA
Rv Roof Maintenance Pomona, CA
Roof Repair For Rv Pomona, CA
Rv Trailer Roof Repair Pomona, CA
Rv Fiberglass Roof Repair Pomona, CA
Rubber Roof Installation Pomona, CA
Rubber Roof For Rv Pomona, CA
Rv Slide Out Roof Repair Pomona, CA
Rv Roof Leak Repair Near Me Pomona, CA
Rubber Roof For Camper Pomona, CA
Rubber Roof For Rv Pomona, CA
Class C Rv Roof Repair Pomona, CA
Best Rv Roof Repair Pomona, CA
Rv Trailer Roof Repair Pomona, CA
Rv Trailer Roof Repair Pomona, CA
Rv Roof Repair Near Me Pomona, CA
Rv Roof Repair Pomona, CA
Rv Roof Maintenance Pomona, CA
Rv Roof Maintenance Pomona, CA
Rv Trailer Rubber Roof Repair Pomona, CA
Rubber Roofing For Rv Pomona, CA
Rv Rubber Roof Replacement Cost Pomona, CA
Rv Roof Repair Pomona, CA
Rubber Roof For Camper Pomona, CA
Rv Roof Repair Service Near Me Pomona, CA
Rv Rubber Roof Maintenance Pomona, CA
Rubber Roofing For Campers Pomona, CA
Rv Rubber Roof Repair Pomona, CA
Resealing Rv Roof Pomona, CA
Rv Roof Leak Repair Near Me Pomona, CA
Rv Roof Maintenance Pomona, CA
Rv Trailer Roof Repair Pomona, CA
Rv Trailer Rubber Roof Repair Pomona, CA
Resealing Rv Roof Pomona, CA
Best Rv Roof Repair Pomona, CA
Rv Rubber Roof Replacement Cost Pomona, CA
Repair Rv Roof Leak Pomona, CA
Rv Roof Leak Repair Near Me Pomona, CA
Rv Rubber Roof Replacement Pomona, CA
Repair Rv Roof Leak Pomona, CA
Rv Roof Repair Service Near Me Pomona, CA
Rv Rubber Roof Repair Pomona, CA
Rv Fiberglass Roof Repair Pomona, CA
Motorhome Roof Replacement Pomona, CA
Rv Roof Replacement Pomona, CA
Motorhome Roof Replacement Pomona, CA
Resealing Rv Roof Pomona, CA
Rv Roof Repair Near Me Pomona, CA
Rv Rubber Roof Replacement Cost Pomona, CA
Rv Roof Repair Fiberglass Pomona, CA
Rubber Roof For Camper Pomona, CA
Repair Rv Roof Leak Pomona, CA
Rubber Roofing For Rv Pomona, CA
Roof Repair For Rv Pomona, CA
Rv Rubber Roof Repair Pomona, CA
Rv Trailer Rubber Roof Repair Pomona, CA
Rv Fiberglass Roof Repair Pomona, CA
Motorhome Roof Replacement Pomona, CA
Best Rv Roof Repair Pomona, CA
Rv Roof Leak Repair Pomona, CA
Repair Rv Roof Pomona, CA
Repair Rv Roof Pomona, CA
Rv Roof Repair Pomona, CA
Rv Roof Repair Pomona, CA
Rv Rubber Roof Maintenance Pomona, CA
Replace Rv Roof Pomona, CA
Rv Slide Out Roof Repair Pomona, CA
Rv Trailer Rubber Roof Repair Pomona, CA
Rubber Roof For Camper Pomona, CA
Rv Roof Repair Service Near Me Pomona, CA
Near Seo For Small Business Pomona, CA
In My Area Seo Company Near Me Pomona, CA
OCRV Center
Table of Contents
- – Rubber Roof For Camper Pomona, CA
- – OCRV Center
- – Rv Trailer Rubber Roof Repair Pomona, CA
- – Rubber Roofing For Rv Pomona, CA
- – Rv Roof Repair Near Me Pomona, CA
- – Rubber Roof Installation Pomona, CA
- – Best Rv Roof Repair Pomona, CA
- – Rv Roof Repair Fiberglass Pomona, CA
- – Rv Roof Repair Pomona, CA
- – Repair Rv Roof Pomona, CA
- – Rv Roof Repair Service Near Me Pomona, CA
- – Epdm Rv Roof Repair Pomona, CA
- – Rv Rubber Roof Replacement Cost Pomona, CA
- – Rubber Roof Installation Pomona, CA
- – OCRV Center
Latest Posts
Health Insurance Seniors Tustin
Huntington Beach Health Insurance For Seniors
Best Private Health Insurance Plans Villa Park
More
Latest Posts
Health Insurance Seniors Tustin
Huntington Beach Health Insurance For Seniors
Best Private Health Insurance Plans Villa Park