All Categories
Featured
Table of Contents
- – Rv Trailer Repair Shop Brea, CA
- – OCRV Center
- – Horse Trailer Repairs Brea, CA
- – Trailer Window Replacement Brea, CA
- – 5th Wheel Repair Near Me Brea, CA
- – Travel Trailer Repairs Brea, CA
- – Travel Trailer Repairs Brea, CA
- – Cargo Trailer Repair Brea, CA
- – Rv Trailer Repair Near Me Brea, CA
- – Travel Trailer Window Replacement Brea, CA
- – Trailer Awning Replacement Brea, CA
- – Horse Trailer Repairs Brea, CA
- – 5th Wheel Repair Near Me Brea, CA
- – Fifth Wheel Service Brea, CA
- – OCRV Center
Rv Trailer Repair Shop Brea, CA
Motor homes provide enjoyable, exhilaration, and lots of adventurous chances. For all that they have to offer, they require regular interest in the type of upkeep and maintenance to keep them looking and working at their prime for as lengthy as feasible. Among the most important things to keep an eye out for with camper trailers and Motor homes is water damage, as these cars by their very nature are generally subjected to the components.
If water invasion has actually triggered the timber framing of your recreational vehicle or camper to obtain wet, after that you'll need to enable it to completely dry out prior to covering it back over with timber flooring. Enable for al fresco drying out of mounting materials for at the very least a week and after that utilize a mold-killing product such as a borax solution to eliminate future rot problems in the exact same location.
That claimed, it is very essential for framing materials to be completely dried out prior to doing this otherwise you run the risk of developing a kind of shell that encourages rot in the wood below the seal. Enable three to 4 days for epoxy material to totally treat. Now that you've made sure to totally dry out and shield the framing versus future water breach, you can outline brand-new flooring.
I spent a couple of hours scouring this forum for info that would certainly aid me in changing two significant floor locations in my 2011 MPG 181. Like I have actually reviewed numerous of the purchasers did below, I acquired a travel trailer that had concerns that I must have had the ability to detect and take into consideration in my acquisition.
Horse Trailer Repairs Brea, CA
I have not started tearing right into the floor yet as I desire to seek and off the leakages initially to alleviate more water damage. Not much sense in changing a floor that will certainly simply obtain damp again in the next rainfall or trip with a rainstorm. I did obtain some wonderful details here corresponding to what may be dripping and how to evaluate for and fix the leaks.
Anyhow, any help or guidance would certainly be significantly appreciated. I do intend on taking photos and posting them during this project to show to those that may remain in the very same watercraft, or in this instance,, robo.
Identify areas displaying indicators of water damage, bending, or any type of various other problems. This preliminary assessment is essential for leading you in the succeeding fixing steps by aiding you recognize the details materials and tools required. By completely evaluating the problem of the floor covering, you can make informed decisions regarding the extent of the repair services and make sure that you are properly prepared.
Trailer Window Replacement Brea, CA
Put in the time to extensively evaluate and evaluate the damages before getting started on the repair services to accomplish much more reliable and reliable outcomes. After examining the degree of the damages, obtain the crucial materials and tools. Common products for fixing travel trailer floor covering encompass plywood, vinyl, or laminate floor covering, glue, and sealer.
This cautious prep work makes certain that the repair can be executed with accuracy and without hindrance from any unneeded products or obstructions. Use a round saw or jigsaw to meticulously eliminate the jeopardized sections of the floor covering. Implement accurate cuts to ensure a seamless integration with the replacement products.
5th Wheel Repair Near Me Brea, CA
Be thorough in using the cutting tools to maintain precision throughout the procedure, making sure that the brand-new materials fit comfortably right into area. This accuracy is important for the overall success of the repair work, enhancing the toughness and aesthetic communication of the restored flooring. Offer special factor to consider to areas with water damage, as detailed and precise cutting in these areas is crucial for preventing any kind of potential problems down the line.
Complying with the conclusion of the fixing, ensure proper ventilation for your traveling trailer. Open windows and doors to facilitate the circulation of fresh air, expediting the drying out procedure and decreasing the chance of mold and mildew or mildew formation. Allowing sufficient air movement is essential to promoting a healthy and balanced setting within the trailer, alleviating the threat of dampness retention.
After the mended floor covering has actually thoroughly dried and cured, revive your furnishings and decor right into the travel trailer. Take this moment to restructure and revitalize the interior, crafting an inviting room for your future adventures. With the repaired flooring offering a steady foundation, take advantage of this opportunity to improve the design and appearances of your trailer.
A reputable repair solution can ensure that your travel trailer is geared up to stand up to the varied climate conditions Michigan provides, from cold winters months to warm summer seasons. Investing effort and time right into the repair service procedure is an investment in the long life of your travel trailer, guaranteeing it remains a trustworthy friend on your Michigan adventures.
Travel Trailer Repairs Brea, CA
Conserve on your own some time and problem and allow the pros at Recreational vehicle Roof Repair work Florida change your RV floor covering. Usually, we see Motor homes with 20-year-old carpets, vinyl, or linoleum.
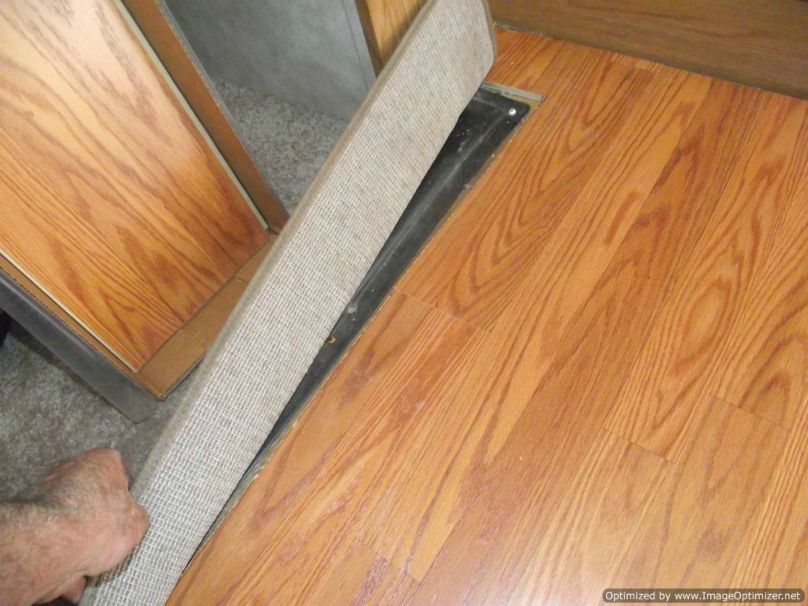
These tack strips extend the border of your coach. When carpeting is installed, it's put on one tack strip and afterwards extended to the opposite wall. Cut a slit in the rug and afterwards begin bring up so it separates from the strips to tear it out. Once the carpet is drawn up, roll it up, and eliminate it from the coach.
Travel Trailer Repairs Brea, CA
It's much heavier than you believe. You might require two individuals to raise it. If you experience stains on your carpeting, hold your breath when you're drawing. Gritty dirt runs away; sometimes it's dried out animal pee. Currently, if your train has a slide out, it's going to be much more difficult. Many older RVs have quit that go the whole way out whereas newer ones have quit come out and after that make the floor flush.
If you intend to maintain going at it on your own, after that pry up the tack strips and staples. If you do not obtain them all, you'll have bumps under your flooring. You'll be stunned at the variety of staples. Some staples are simple to take out. Grab pliers and tug upward or wedge a flat head screw chauffeur underneath, push down on the deal with and it'll slip out.
Cargo Trailer Repair Brea, CA
That occurs with peel and stick flooring tiles. You'll find staples in every edge of your instructor and your hands and fingers will ache from drawing them all up. After they're all out, sweep or vacuum cleaner up the particles and check for staples you missed out on the very first time.
It's vital to make sure that the floor covering is smooth, tidy and there's no shiny paint left behind. Or else the floor covering may not stick.
If you're unsure how to shim that, luan makes a terrific choice. It's additionally important to secure your washroom location well. As you recognize, water makes timber and wood laminate swell and agreement - Brea Rv Trailer Repair Shop. It's even better to make sure that when you're prepared to set up the new flooring that you provide it time to relax in the natural surroundings.
Rv Trailer Repair Near Me Brea, CA
Primer can take a lengthy time to completely dry. In Florida, it can take up to 3 hours with all the humidity. Since you prepare to place in the new floor, make sure it matches the inside. A great deal of men I see run into this problem. They take down the brand-new floor covering just to find their far better half doesn't like the color due to the fact that it doesn't match the interior therapies.
Decide where you want the new flooring and gauge it. Make certain you have the right color, pattern, size and measurements. From there, pick a line that's square and put down a chalk line so you obtain it good and straight. It's tough because lines aren't constantly square. Currently start laying the drifting floors one-by-one.
It's finest to notch the floor covering and make certain you reduced around door jams prior to you lay it down. It won't snap right into place or else. Do a completely dry fit to examine (Brea Rv Trailer Repair Shop). If you're mounting drifting floors, you need to understand they might be devoured on one side and then float over the subfloor.
The floor covering is laid, make sure to cut it out so it looks finished. Now that you understand all the actions included in laying Recreational vehicle floor covering, do you truly want to invest your weekend break doing unpleasant, unclean job?
Travel Trailer Window Replacement Brea, CA
A friend's camper has been dripping for a long time evidently and has actually deteriorated out the flooring, ledger and joists. The neighborhood camper sales/service location desired $200 ...
Identifying aspects include size, flooring choice, slide-out(s), and pre-existing damages beneath, etc. Units without slide-outs will certainly take around 20 to 60 labor hours ($4,000.00 $12,00.00). Please note: this rate does consist of the price of materials and store materials. Slide-outs: 8 to 16 extra labor hours ($1,600.00 $3,200.00). Please note: this rate does include the expense of materials and shop supplies.
Trailer Awning Replacement Brea, CA
Your home furniture is quickly raised and moved to another space or outside. Motor home furnishings is bolted in place. After unbolting the furnishings, generally it will certainly be also huge to fit with the entrance door. Therefore, that furnishings will remain within, and our technician will certainly relocate it from one side of the device to the various other as they function.
If we were to harm these things, we most likely can not get a substitute. RV carpeting is NOT mounted like a home with a tack strip.
Horse Trailer Repairs Brea, CA
Your new flooring choice is a large choosing factor in your general labor price. It is much less time consuming for our professionals to mount carpet or linoleum than it is to mount a hardwood/laminate flooring that requires a service technician to cut each strategy, one at a time. There is additionally preparation work you can add to that saves our specialists time.

***DO NOT EFFORT ANY PREPARATION WORK BEFORE An ASSESSMENT. IF PREPARATION FUNCTION IS NOT FINISHED APPROPRIATELY, IT MAY REASON ADDITIONAL LABOR HOURS FOR OUR SERVICE TECHNICIANS **Please call (209) 263-7040 and set up a RV Flooring Assessment. The appointment sets you back $200.00. This will be credited to your recreational vehicle Floor Replacement job when scheduled.
A few points to take into consideration are the design of your area, the condition of your subfloor, and the level of problem to install your selected pattern. Armstrong has a acrylic grout that resists splitting, discolorations, and remains flexible throughout usage and in travel. If you desire peace of mind that your flooring is mounted correctly, we advise having a specialist flooring installer.
Your RV, motorhome, camper or trailer has been your trusted buddy on numerous experiences, but it likewise lugs the marks of its journeys. These might be in the kind of water damage, rot, or basic deterioration on the RV flooring. Examining the extent of this damages is the primary step towards your location of a beautifully renovated car.
5th Wheel Repair Near Me Brea, CA
The existence of mold and mildew or mildew is another telltale sign of water damage. Take the time to inspect your existing arrangement to, for instance, understand if you need to replace decomposed timber floor covering.
You should not utilize underlayment with any of these alternatives as you can merely utilize a floating floor or stick straight to the plywood. Laminate floor covering is like the all-terrain vehicle of the floor covering worldit's functional, cost-effective, and easy to install. It's a preferred option amongst RV owners many thanks to its light-weight nature and the truth that it mimics the appearance of wood flooring.
Therefore, if you're considering this choice, you'll need to shield it from water damage, especially if you have pets or kids. If you're seeking a flooring alternative that's sturdy, waterproof, and simple to clean, plastic plank floor covering could be your best option. This is a versatile, versatile option given that it stands up to the elements and is developed to last.
Fifth Wheel Service Brea, CA
With your tools, products and strategy in position, it's time to roll up your sleeves and study the meat of this task: removing the old motor home flooring. This process can differ depending upon the kind of floor covering you're managing. Vinyl floor covering, carpeting, and timber floor covering each need a different method.
To eliminate the old rug, adhere to these actions: Cut the carpeting into manageable areas using an energy knife. If your brand-new flooring mount needs underlayment, you can recycle this. Usage pliers or a rug puller to draw up the carpeted sections (be patient, as this process can be lengthy as a result of the variety of staples utilized to safeguard the carpet) As soon as all the carpet is gotten rid of, use a staple lifter or oscillating multi-tool to eliminate any continuing to be staples Removing timber floor covering is a little bit more complex, however it's absolutely nothing an intrepid DIYer can not handle.
What does it imply to evaluate the sub-floor? Try to find any type of indications of damage that might influence the flooring's integrity, such as rot, mold and mildew, or water damages. If you uncover any signs of water damage, such as discoloration, warping, or mold and mildew, you'll need to address these problems before proceeding with the floor covering installation.
If your sub-floor has significant damage, repairing Sometimes, the damage to the sub-floor is so extensive that repairing just the harmed sections isn't enough. While it might be feasible to repair on your own, we recommend seeing your regional Motor home repair service store to determine following steps to make sure the integrity of your floor.
Travel Trailer Service Brea, CATrailer Awning Replacement Brea, CA
Trailer Floor Repair Brea, CA
Travel Trailer Repairs Brea, CA
Trailer Restoration Brea, CA
Trailer Floor Repair Brea, CA
Rv Trailer Repair Shop Brea, CA
Trailer Roof Repair Brea, CA
Horse Trailer Repairs Brea, CA
5th Wheel Repair Near Me Brea, CA
Trailer Awning Replacement Brea, CA
Rv Travel Trailer Repair Near Me Brea, CA
Rv Trailer Repair Shops Near Me Brea, CA
Travel Trailer Awning Replacement Brea, CA
Fifth Wheel Repair Near Me Brea, CA
Fifth Wheel Service Brea, CA
Rv Trailer Repair Near Me Brea, CA
Rv Trailer Repair Shops Near Me Brea, CA
Travel Trailer Furniture Brea, CA
Camper Trailer Service Brea, CA
Rv Trailer Service Near Me Brea, CA
Trailer Windows Replacement Brea, CA
Trailer Floor Repair Brea, CA
Travel Trailer Roof Replacement Brea, CA
Trailer Windows Replacement Brea, CA
Travel Trailer Service Brea, CA
Travel Trailer Repairs Brea, CA
Fifth Wheel Repair Near Me Brea, CA
Camper Floor Repair Near Me Brea, CA
Travel Trailer Siding Repair Brea, CA
Trailer Roof Repair Brea, CA
Horse Trailer Repair Near Me Brea, CA
Travel Trailer Replacement Windows Brea, CA
Travel Trailer Roof Replacement Brea, CA
5th Wheel Repair Near Me Brea, CA
Rv Trailer Repair Near Me Brea, CA
Trailer Roof Repair Brea, CA
5th Wheel Repair Near Me Brea, CA
Camping Trailer Repair Near Me Brea, CA
Horse Trailer Repair Near Me Brea, CA
5th Wheel Repair Near Me Brea, CA
Trailer Windows Replacement Brea, CA
Trailer Restoration Brea, CA
Rv Trailer Repair Shop Brea, CA
Rv Trailer Repair Shop Brea, CA
Rv Trailer Repair Shop Brea, CA
Travel Trailer Roof Replacement Brea, CA
Trailer Awning Replacement Brea, CA
Travel Trailer Awning Replacement Brea, CA
Trailer Windows Replacement Brea, CA
Rv Trailer Repair Shops Near Me Brea, CA
Fifth Wheel Service Brea, CA
Travel Trailer Awning Replacement Brea, CA
Travel Trailer Ceiling Repair Brea, CA
Horse Trailer Repair Near Me Brea, CA
Trailer Window Replacement Brea, CA
Travel Trailer Service Brea, CA
Horse Trailer Repair Near Me Brea, CA
Rv Trailer Repair Near Me Brea, CA
Trailer Restoration Brea, CA
Fifth Wheel Service Brea, CA
Travel Trailer Replacement Windows Brea, CA
Travel Trailer Ceiling Repair Brea, CA
Travel Trailer Replacement Windows Brea, CA
Trailer Window Replacement Brea, CA
Camping Trailer Repair Near Me Brea, CA
Horse Trailer Repair Near Me Brea, CA
Travel Trailer Ceiling Repair Brea, CA
Fifth Wheel Repair Near Me Brea, CA
Travel Trailer Ceiling Repair Brea, CA
Rv Trailer Repair Shop Brea, CA
5th Wheel Repair Near Me Brea, CA
Trailer Windows Replacement Brea, CA
Travel Trailer Ceiling Repair Brea, CA
Travel Trailer Ceiling Repair Brea, CA
Rv Trailer Repair Shops Near Me Brea, CA
Travel Trailer Floor Repair Brea, CA
Travel Trailer Furniture Brea, CA
Near Top Seo Company Brea, CA
Finding A Good Local Seo Services Near Me Brea, CA
OCRV Center
Table of Contents
- – Rv Trailer Repair Shop Brea, CA
- – OCRV Center
- – Horse Trailer Repairs Brea, CA
- – Trailer Window Replacement Brea, CA
- – 5th Wheel Repair Near Me Brea, CA
- – Travel Trailer Repairs Brea, CA
- – Travel Trailer Repairs Brea, CA
- – Cargo Trailer Repair Brea, CA
- – Rv Trailer Repair Near Me Brea, CA
- – Travel Trailer Window Replacement Brea, CA
- – Trailer Awning Replacement Brea, CA
- – Horse Trailer Repairs Brea, CA
- – 5th Wheel Repair Near Me Brea, CA
- – Fifth Wheel Service Brea, CA
- – OCRV Center
Latest Posts
Fountain Valley Employee Benefits Consulting
Brea Health Insurance Plans For Students
Affordable Web Design Irvine
More
Latest Posts
Fountain Valley Employee Benefits Consulting
Brea Health Insurance Plans For Students
Affordable Web Design Irvine