All Categories
Featured
Table of Contents
Painting Rv Walnut, CA
Chalk paint is common in Motor homes. One motor home proprietor I understand chosen to conserve money by making her own chalk paint utilizing a dish located online. She made use of self-made chalk paint successfully prior to when paint furnishings, yet it removed when she used it to paint her RV closets. She didn't understand precisely what caused the trouble and needed to sand everything off.
I do not consider this a painting blunder considering that I'm uncertain it can have been anticipated, yet it was an issue encountered by motor home proprietor Christina. When painting her recreational vehicle, she covered the joints between the closets and the wood trim. The initial time Christina's motor home was moved after the closets were painted, the paint gurgled up as the motor home changed throughout transit.
Rv Paint Walnut, CA
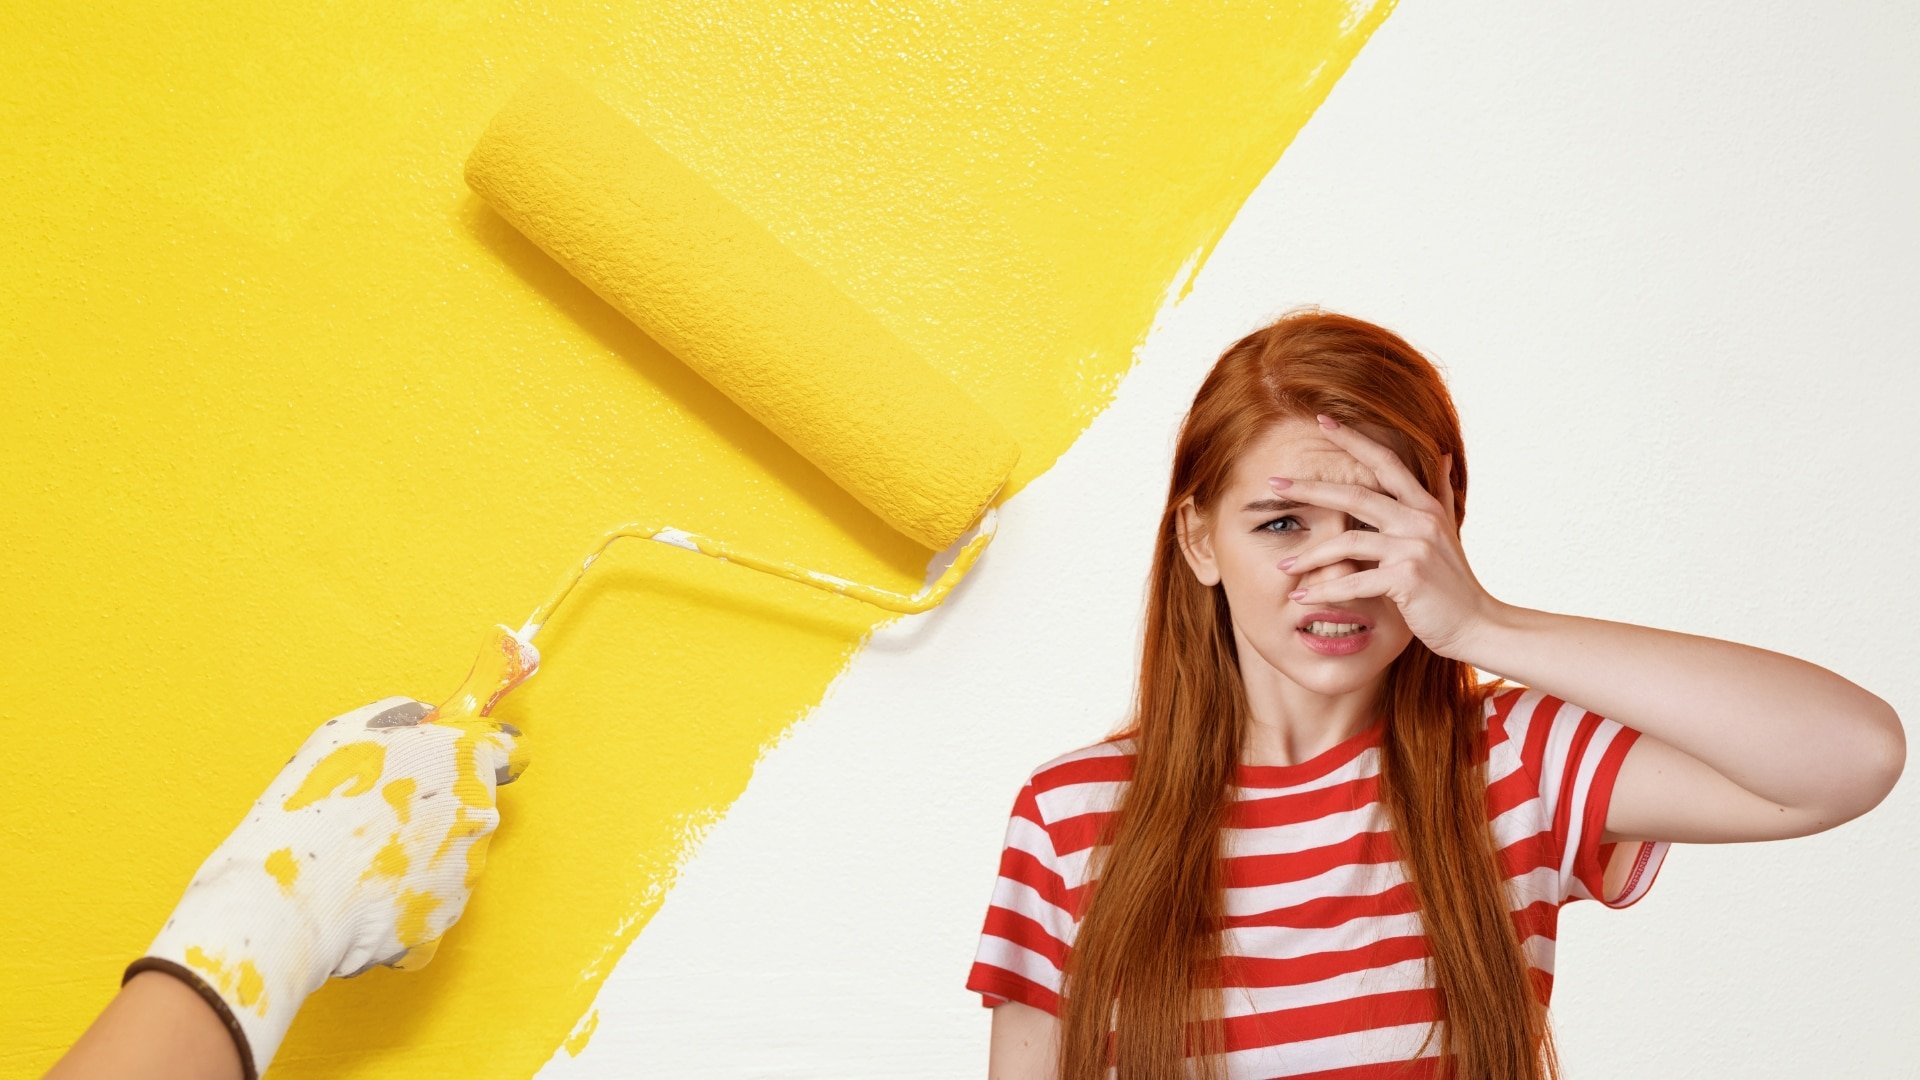
I wanted light grey when I chose the paint shade for my wall surfaces, but it looked white in the sunshine! I have a friend who purchased paint called charcoal, but one coat revealed that it was blue, not grey! Prevent this by buying a sample dimension of the paint first.
Repaint a test area or paint a poster board and hold it under various illumination in your recreational vehicle. If you eliminate the painter's tape while the paint is still wet, you may mistakenly smear the paint. If you wait till it's completely dry, the tape could peel off the paint off! That's what happened in the motor home envisioned listed below.
The tape can easily break with the paint but won't trigger it to smear. If you see that the paint is creating the tape, utilize a razor blade to rack up along the edge before you pull. When you've purchased a sort of paint that was advertised as calling for just one coat, it can be annoying to see the old wall color revealing via.
Rv Painting Walnut, CA
A thick layer of paint or returning over repainted areas prior to they are fully completely dry, can conflict with drying time. This can lead to an uneven surface or leave visible brush strokes or marks from the paint roller. Plan on 2 coats for anything you repaint in your recreational vehicle.
, yet she still assists out as the blog site editor. Ashley invested three years living full time in a 38-foot, 5th-wheel Recreational vehicle with her husband Josiah and their feline, Kitty.
Painting Rv Walnut, CA
If you're bound and established to remove the professionals and make this a do it yourself job, this little overview will set you on the appropriate track. A gear with a fresh coat of exterior recreational vehicle paint is a lovely point, particularly if you are in charge of it. However, outside paints, particularly in RV and marine applications, featured a degree of scientific class.
When you atomize your paint with an HVLP or airless sprayer, it requires to bond to the surface area at a molecular degree. Without proper preparation, it can not bond. The results will look fantastic, a minimum of up until the very first bump goes along and an entire sheet of paint diminishes. Prep work is vital long prior to you struck up the paint aisle at the hardware store.
It's frequently much less concerning the material of the sidewalls and more about the original paint. Most consumers leaping on the Do it yourself paint work bandwagon are improving an existing visual, not repainting the raw fiberglass or aluminum surface area of a RV.
Painting Rv Walls Walnut, CA
If you are repainting the raw surface area, we've got you covered there. Your substratum will generally be old paint unless you take place to be repainting Recreational vehicles as they come off the setting up line. There are 2 points you need to understand that are of the utmost importance in regards to paint durability, durability, and a fantastic visual: surface preparation and bonding guide.
Yes, it will certainly increase the expense of a DIY RV paint job, but it will additionally conserve you a great deal of money and distress in the close to future. The remainder steams down to your overcoat of selection. Which one is the finest, and what do they all imply? Polymer is a solid option as an exterior RV paint, specifically if you're repainting the raw surface area of a light weight aluminum motor home.
Motorhome Paint Repair Walnut, CA
Considering that polymer is a thin paint, it will typically set you back more for the added coverings. Acrylic is usually utilized as a combination for outside paints, such as acrylic-enamel.Latex is a water-based paint and, for the longest time, oil-based paints have actually always been the go-to motor home exterior paint of option, or outside anything, for that matter.
It's hard to give this one a solid 'yes,' though given that lasting viability is still ever before so somewhat up in the air.Enamel is oil-based and provides the thickest single coat of the lot. It dries slowly, yet it also dries out hard, creating a protective covering. Its slow drying time makes paint errors fixable.
Quickly one of the most flexible coating layers on the checklist, one-part polyurethane jobs with timber, fiberglass, steel, aluminum, and plastics. It gives UV security and decreases the requirement for waxing, thanks to its glossy coating. It also improves wind resistant efficiency and is a strong waterproofing option. Surface preparation for polyurethane is an exquisitely comprehensive and patient procedure, however.Two-part polyurethane has all the benefits of one-part polyurethane, except the finish is harder, has a greater gloss appearance, and is far more expensive.Epoxy paints are the main exterior paints in united state.If you're choosing a super-glossy appearance, water-based is the incorrect selection. Outside motor home paint is everything about surface area prep. Without surface preparation, your overcoat might also be made of fairy floss. Since that's about what you'll get out of ita hugely vivid and attractive visual, swiftly adhered to by wreck, anguish, and moving back in with your in-laws. With proper surface prep, the exterior-grade paint you select will certainly
be exactly how your RV presents itself to the globe. There are a great deal of challenging options in the above listing, and RVers will certainly all be satisfied to inform you their own individual choice. Eventually, it's a matter of getting what you pay for. But that's not to claim the various other selections are incorrect, just much less effective in regards to longevity . Marine grade might seem like it has absolutely nothing to do with Motor homes, but it does, in the majority of means. Watercrafts and Motor homes share lots of common features. Some are aluminum, and some are fiberglass. Both require UV defense, waterproofing, corrosion resistance, versatility, and a beneficial aesthetic. While temperature impacts the treating process of external RV paint, there's still a window in which most paint applications are ideal. You're excellent to enter temperatures anywhere between 50F and 85F. Prior to you start, take notice of the weather, particularly if you choose an oil-based paint. Because they heal slower, the window for disaster is larger. That will be more hard near the Gulf of Mexico, the Pacific Sea, or the Atlantic Sea . In those instances, locate an indoor center, head inland, or wait until the fall. Stay clear of windy problems whenever possible, specifically if you're going to use a paint sprayer. This is where all the fun scientific research stuff begins. While bonding primer is frequently thought of as the supreme requirement for a solid top coat to stick, it's.
Painting Rv Exterior Walnut, CA
not. It's extremely essential, yet it's not the end-all-be-all of the process. Not just do you have to sand every square inch of surface on your recreational vehicle, yet you additionally have to sand your bonding primer. The majority of bonding primers will certainly give you with a 7-day window for optimum topcoat adherence. When you come back, use 220+ grit sandpaper to gently open up the guide and eliminate any kind of flaws. Do not dig unfathomable with the sandpaper, as you don't intend to mistakenly eliminate the bonding guide. The path to creating the ideal outside recreational vehicle paint task begins and finishes with a sprayer. The problem is not everybody fits using one. Hold that trigger for too lengthy or get the tip as well close to the surface area, and things go.
south in a rush. If you prefer to utilize a roller, a three-inch, high-density foam roller is the ideal choice. It generates the smoothest coating without leaving behind small fibers that come from woollen rollers. This is essential to an effective surface. You should only make use of paint brushes for difficult-to-access locations and stick to the foam kind rather than the bristles. The bristles have a tendency to leave small rows behind, which looks poor when it treatments. No matter what you do, don't overdo it. Gravity antagonizes paint, similar to everything else. Place the idea about 8 to 12 far from the surface area and relocate quickly with overlapping rows. The lady's rate (in the above video) is right, however, sometimes, her technique is not. At the 2:01 -minute mark, her strategy is best, keeping an equivalent distance backwards and forwards the paint surface area. It might appear trivial, however it develops whole rows of slim paint that sandwich rows of thick paint in between them. Make certain that there will certainly be no damaging climate occasions, to the finest of your capacity, in the 24 hours following your paint job. For high-gloss or high-sheen coatings, don't wax it. For low-gloss or low-sheen paint tasks, do not hesitate to wax the finished item. The very best way to maintain the visual and total charm of your outside recreational vehicle paint job is to regularly clean it. You do not need to go all wild and clean it every 2 or three days. Simply develop a routine and maintain it clean. A DIY exterior recreational vehicle paint work isn't as lavish and revitalizing as it appears. Fortunately is that nothing that looks great ever before originates from little effort. You can always obtain an expert to do it. There are marine commercial painters and vehicle detailers that would love to do it. Plus, we share top item referrals so your camper appears looking fresh. For referral, I use base shade to repaint approximately. That straightens with the estimated required for full insurance coverage. This consisted of, with some overlap and typical overspray waste. Below is a basic estimate of exactly how much paint you'll need to cover the. To give both gears a fresh makeover, this is the exterior paint technique that we suggest. Walnut Painting An Rv. Wish to take a look at both restorations? Right here is the 2007 Keystone Hornet and the 2005 Keystone Hornet. Right here is how to paint your recreational vehicle's exterior. 1 Begin by offering your recreational vehicle a good laundry to get rid of any dirt, dust, or road gunk.
See to it to wash thoroughly so no soap or residue is left. Let the Motor home prior to moving on to the following stepthis helps your tape stick far better and protects against moisture from getting entraped under paint. 2 they'll cause the paint to peel and leave behind an unequal surface. Make use of a heat weapon to gently warm up the vinyl. This softens the glue and makes removal simpler. Begin at one corner and slowly pull it off. A 3M sticker cleaner tool can be a huge helpespecially for old, sun-faded stickers that are brittle or stuck on limited. Rub out any type of sticky residue with a fabric and Bum around, a glue cleaner, or also orange important oil (which functions remarkably well! ). 3 Prior to you paint, it's a terrific concept to remove any kind of plastic components or trim piecesespecially if your motor home is older. With time, components like can become faded, fragile, or cracked from sunlight exposure. This is an excellent time to replace them with(you can find plenty at RecPro ). I likewise suggest getting rid of the and repainting them separately. To eliminate the hatch doors, simply unscrew one end of the joint and. Peel any old from the structure, and once every little thing is repainted and completely dry, change it with a fresh gasket for a tighter seal and a sleek look. 4 Much like when repainting the interior of your motor home or your home, you'll want to like windows, lights, trim, door handles, vents, and any kind of accessories you could not remove. It allows you apply painter's tape and concealing film with each other, which.
Rv Paint Repair Walnut, CA
conserves time and assists you obtain tidy, straight lines. Use concealing film to cover larger areas and shield them from overspray. Walnut Painting An Rv. Press the sides down firmlyespecially around joints and hardwareto keep paint from creeping beneath. If you're eliminating components like vent covers or lights, break a fast photo before taking them off. Usage or a fining sand block to. The goal here isn't to remove layersjust to boring the glossy finish and offer the brand-new paint something to hold onto. Take your time and work uniformly across the surface. This step is essential for helping (or any type of vehicle paint) stick appropriately and providing you a smooth, resilient finish. 6 After sanding, it is necessary to extensively clean up the surface area before you start painting. with acetone and a to eliminate any kind of oils, grease, or deposit that might prevent the paint from sticking. with a to grab fining sand dirt. to catch any remaining bits for a clean, paint-ready surface area. Make certain the surface is completely dry prior to proceeding to guide. 7 With your surface clean and prepped, it's time to use the primer. Using a, apply a light, also coat to all areas you prepare to repaint. Primer produces a smooth, consistent base and assists the paint stick appropriately. Avoid paint in direct sunshine, on windy days, or when dust remains in the airthese conditions can impact just how the primer dries and can lead to a harsh or uneven surface. 8 Currently it's time to bring your recreational vehicle's new appearance to life! Making use of a, apply the base shade in smooth, also passes. For the ideal results, adhere to these actions: Use a light, also layer utilizing. Maintain the sprayer concerning and keep a to prevent lap marks. Allow the paint completely dry completely according to the producer's instructions. This aids the following layer stick much better and smooths out any type of tiny blemishes. Wipe every little thing down with a to get rid of any dust. After that use a to get any type of staying fragments. Use a 2nd coat using the very same method. If the paint still looks irregular after drying, repeat the scuffing and cleansing process, after that apply a 3rd coat if required. When the paint is completely cured(adhere to the timeline on your Dupli-Color or chosen item), you can to improve the luster and provide it a tidy,

OCRV Center
Address: 23281 La Palma Ave Yorba Linda, CA 92887Phone: (714) 909-1444
Email: [email protected]
OCRV Center
professional look. Wait up until the paint is totally cured prior to buffingrushing this step can dull or harm your finish. Remember to effectively prep the outside surface area to ensure that the paint has something to abide by. It's an age-old question. Do you take your RV to a custom-made paint shop or select a DO IT YOURSELF RV paint job? As a RV owner, it's an inquiry that you ultimatelyhave to face when your RV's outside begins to put on. There's no right or incorrect solution when it comes to choosing a specialist RV paint task or going the DIY paint route. One of the most likely reason a person picks to go do it yourself is because of the price variable. Depending on the size and design, the ordinary recreational vehicle paint task can vary from $5,000-$15,000+. Painting a recreational vehicle by yourself, nevertheless, can be as affordable as $300 if you want to spend the moment and effort. If you can save the effort, you can do the labor yourself and conserve money in the process. With assistance from the internet, you can find out to achieve anything. There's a wealth of knowledge to guide you detailed via the procedure of paint your RV. You can bring up a composed guide on your phone(or print them out )or you can follow in addition to a YouTube video. While it might seem discouraging to filter with, with patience and resolution, you can use these resources to aid you transform your motor home exterior. When you make a decision to repaint your motorhome by yourself, you have total control over what happens. You choose what sort of paint and materials are utilized. Be as fancy or as small as you desire. As long as you have the capability to, you can tailor your exterior to your taste. There's also a feeling of achievement that comes with handling a big do it yourself job. You can not defeat the feeling of standing back and really feeling pride in the effort you have actually placed in. When you go to a custom-made paint store, there's an expectation in the high quality of the last product. That expectation comes from the experience and sources that a paint shop needs to provide. Custom-made paint stores include employeesthat are educated in a procedure that's been executed many times. That process has actually been pin down right into an efficient routine for the shop workers. Not every person is artistically inclined. And developing styles for a RV may be more challenging than anticipated. If you aren't the creative kind, a RV paint store will certainly have plentyof durable designs and shades to pick from. They'll collaborate with you to get the best appearance out of your motor home. [] While do it yourself is a cost-saving step, it will certainly use up a good piece of time to total painting your RV. Approximated time to complete a DIY recreational vehicle task can take up to 30 hours or even more. Those who work full-time might find it tough to locate the spare time beyond the weekend break to go through painting their mobile home. Eventually, the decision is yours on how to care for your recreational vehicle. It's your lorry and your journey. Just make certain to take into consideration all your choices when making that option. If you choose to obtain your paint done professionally and are trying to find a premium, top notch service, take a look at CDI Customized Paint today and get a quote. We are still in the Madison, Wi. campground at the FMCA rally. We talked to folks from Mike's Custom-made Paint in Bremen, In. About doing an overall repaint of our 1999 DSDP.From what they stated, and what you can see on their internet site, I have little uncertainty they would do a very first price job. Quality of materials and handiwork are what I'm searching for. If you have comments you prefer to not publish on the online forum, please send them to me at:! Bob. Thanks for all the replies. I remain in the beginning of considering this, however the m/h requires it. I'm either mosting likely to have this done, or tidy it up and offer it and get something a little much better- possibly willwait till spring if I perform. I'm exceptionally pleased with the rest of the m/h, floorplan, mechanicals, etc, so I really wouldn't mind keeping this set. I recognize I'm going to get some flack for this and some people are mosting likely to drink their heads and raise some brows. I do not adhere to the guidelines for auto-body painting and maybe not even for camper paint. Here's why, That's. I don't spray it, I don't utilize auto paint. Occasionally I don't also remove the stickers(gasp!). Is it ideal? No. Is it way much better than prior to? Yes. Am I embarrassed to be seen with it after it has been painted? No. Was I previously bothered with being misinterpreted for a mobile meth lab? Yes. Am I stressed over it now? No. I constantly evaluate a job prior to diving in and utilizing any one method. I will always check the stickers and effort to remove them first. If you would love to try to eliminate the stickers, you will certainly desire to try the adhering to supplies: The proper way to paint a recreational vehicle exterior involves eliminating stickers, power cleaning, taping and covering home windows and then splashing on an automotive grade paint with a paint sprayer. If you have actually been turned away at certain camping areas based on your recreational vehicle's look, you must paint. Right here is what I do to prep the surface area prior to paint: Gently sand areas where the decals are bubbling or peeling up Power wash every little thing, including the roofing system Permit to dry completely Seal up corners and around all home windows with a paintable caulk.
Rv Painting Near Me Walnut, CARv Painting Walnut, CA
Rv Paint And Body Shops Near Me Walnut, CA
Paint Rv Walnut, CA
Paint Motorhome Exterior Walnut, CA
Custom Painted Motorhomes Walnut, CA
Motorhome Custom Paint Jobs Walnut, CA
Custom Painted Motorhomes Walnut, CA
Rv Paint And Body Shops Near Me Walnut, CA
Motorhome Custom Paint Walnut, CA
Motorhome Custom Paint Jobs Walnut, CA
Paint Fiberglass Rv Walnut, CA
Motorhome Paint Repair Walnut, CA
Motorhome Painting Walnut, CA
Painting An Rv Walnut, CA
Painting Rv Walnut, CA
Motorhome Painting Near Me Walnut, CA
Painting Rv Walls Walnut, CA
Motorhome Painting Walnut, CA
Rv Paint Job Walnut, CA
Motorhome Painting Near Me Walnut, CA
Paint Fiberglass Rv Walnut, CA
Custom Painted Motorhomes Walnut, CA
Custom Rv Paint Jobs Walnut, CA
Rv Exterior Paint Walnut, CA
Custom Painted Motorhomes Walnut, CA
Painting Rv Walls Walnut, CA
Rv Paint And Repair Walnut, CA
Paint Rv Walnut, CA
Custom Motorhome Paint Jobs Walnut, CA
Painting Fiberglass Motorhome Walnut, CA
Custom Rv Paint Walnut, CA
Rv Paint Job Walnut, CA
Custom Motorhome Paint Jobs Walnut, CA
Rv Paint And Repair Walnut, CA
Rv Exterior Paint Walnut, CA
Motorhome Paint Shops Walnut, CA
Rv Paint And Repair Walnut, CA
Class A Rv Custom Paint And Repair Walnut, CA
Motorhome Paint Repair Walnut, CA
Paint Rv Walnut, CA
Motorhome Custom Paint Jobs Walnut, CA
Rv Paint And Body Shops Near Me Walnut, CA
Painting An Rv Walnut, CA
Motorhome Painting Near Me Walnut, CA
Custom Motorhome Paint Jobs Walnut, CA
Rv Paint Repair Walnut, CA
Motorhome Paint Repair Walnut, CA
Rv Painting Near Me Walnut, CA
Custom Rv Paint Walnut, CA
Custom Rv Paint Walnut, CA
Motorhome Custom Paint Jobs Walnut, CA
Painting Rv Walls Walnut, CA
Rv Paint Walnut, CA
Paint Motorhome Exterior Walnut, CA
Motorhome Custom Paint Walnut, CA
Rv Painting Near Me Walnut, CA
Rv Paint Shop Near Me Walnut, CA
Paint Motorhome Exterior Walnut, CA
Motorhome Custom Paint Walnut, CA
Motorhome Paint Repair Walnut, CA
Motorhome Custom Paint Walnut, CA
Motorhome Custom Paint Walnut, CA
Rv Paint Shop Near Me Walnut, CA
Rv Painting Walnut, CA
Custom Painted Motorhomes Walnut, CA
Painting An Rv Walnut, CA
Paint Fiberglass Rv Walnut, CA
Rv Painting Near Me Walnut, CA
Motorhome Paint Shops Walnut, CA
Painting Fiberglass Motorhome Walnut, CA
Paint Motorhome Exterior Walnut, CA
Paint Rv Walnut, CA
Paint Motorhome Exterior Walnut, CA
Custom Rv Paint Walnut, CA
Painting Rv Walls Walnut, CA
Rv Paint Shop Near Me Walnut, CA
Custom Painted Motorhomes Walnut, CA
Find A Seo Marketing Company Walnut, CA
Best Seo Firm Walnut, CA
OCRV Center
Latest Posts
Senior Insurance Solutions Placentia
Family Plan Health Insurance Brea
Planning Life Insurance Laguna Hills